From Flat to Spatial: Creating a 3D Product Grid with React Three Fiber
A practical walkthrough of building a curved 3D product grid with React Three Fiber and GLSL, covering shaders, animation, and performance.
Free course recommendation: Master JavaScript animation with GSAP through 34 free video lessons, step-by-step projects, and hands-on demos. Enroll now →
Product grids are the white-box gallery of e-commerce — neutral by default, inoffensive by design. Which is strange, because the physical experiences that actually move product have always known that environment is part of the sell. Lighting makes decisions. Arrangement communicates value. The space has a point of view.
The web version usually opts out of all of that.
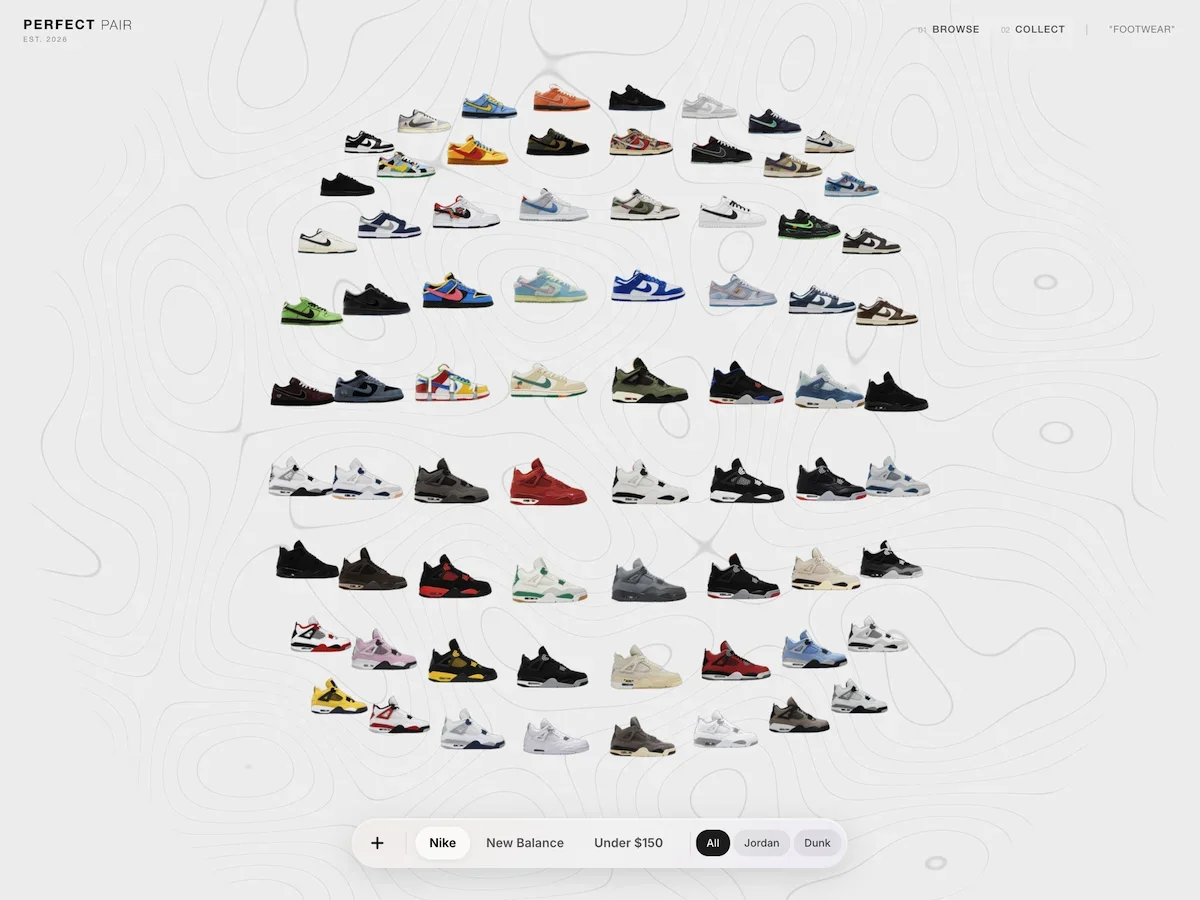
I wanted to see what it would take to close that gap — not as a novelty, but as a genuine attempt to make browsing feel like being somewhere. This article walks through how I built it: a curved 3D product grid using React Three Fiber, a topographic GLSL background, holographic selection states, and a spring-damped camera rig. Along the way there are some patterns worth stealing — around shader architecture, animation interruptibility, and where to draw the line between React state and mutable refs.
The Stack
The project runs on Next.js, React Three Fiber, Tailwind, and Motion. The two custom shaders are written in GLSL and imported as ES modules through a glslify webpack pipeline.
The glslify setup is worth calling out because it is the one piece of infrastructure that makes shader development feel modern. A two-loader chain in next.config.mjs lets us write #pragma glslify: snoise = require('glsl-noise/simplex/2d') inside our GLSL and import the compiled result as a string.
Architecture
The system has four layers, and understanding where each one starts and stops is what keeps the project clean:
┌─────────────────────────────────────────────────┐
│  DOM Layer (Framer Motion)                      │
│  Control bar, filters, minimap, overlays        │
├─────────────────────────────────────────────────┤
│  Scene Layer (React Three Fiber)                │
│  Canvas, camera rig, lighting                   │
├─────────────────────────────────────────────────┤
│  Tile Layer (per-card useFrame loops)           │
│  Position, scale, opacity, shader uniforms      │
├─────────────────────────────────────────────────┤
│  Shader Layer (raw GLSL)                        │
│  Topography background, holographic card sheen  │
└─────────────────────────────────────────────────┘
Data flow. Shoe data is a JSON array. Each collection (Nike, New Balance, Budget) maps to a separate array. Filters narrow within a collection; collection switches swap the entire array.
Interaction loop. Pointer events on the canvas update a mutable rigState object. The camera rig reads that every frame and damps toward the target. Each tile reads the same rigState to know if it is selected, then adjusts its own position, scale, and shader uniforms.
The decision that shaped everything was what to put in React state versus mutable refs. I learned this the hard way: anything that changes at 60fps — camera position, tile animation progress, shader uniforms — cannot live in React state. The reconciliation overhead kills you. Those values live in plain mutable objects that useFrame callbacks read directly. React state is reserved for discrete user actions: which collection is active, which filters are set, which tile is selected.
The Grid
The first problem was layout. I needed to take a flat list of shoes and arrange them in a centered grid in 3D space, with enough flexibility to support filtering (which changes the item count) and collection switching (which changes everything).
Configuration
All grid parameters live in a mutable singleton — not React state, not context, just a plain object:
const CONFIG = {
  gridCols: 8,
  itemSize: 2.5,
  gap: 0.4,
  zoomIn: 12,
  zoomOut: 31,
  curvatureStrength: 0.06,
  dampFactor: 0.2,
  tiltFactor: 0.08,
  cullDistance: 14,
};
I wired every value into Leva debug controls during development. Dragging a “curvature” slider and watching the grid bowl deepen in real time was invaluable for dialing in feel — something you cannot do with hardcoded constants and a refresh cycle.
Positioning
Tile positions come from simple column-major math, centered at the origin:
const spacing = CONFIG.itemSize + CONFIG.gap;
const col = filteredIdx % CONFIG.gridCols;
const row = Math.floor(filteredIdx / CONFIG.gridCols);
const x = col * spacing - gridWidth / 2 + spacing / 2;
const y = -(row * spacing) + gridHeight / 2 - spacing / 2;
X runs left-to-right. Y runs top-to-bottom. Z is entirely reserved for depth effects — curvature, focus, and transition animations. Keeping Z free turned out to be one of the better early decisions, because it meant I could layer multiple depth effects additively without them fighting each other.
The Cards
Each shoe is a ShoeTile — a <group> containing a hit-test plane, an image mesh with our custom shader material, text labels, and a close button.
Textures
I preload every texture at module level before any component mounts. This was non-negotiable — without it, switching collections caused visible pop-in as textures uploaded to the GPU one by one:
shoes.forEach((shoe) => {
  useTexture.preload(shoe.image_url);
});
Each tile computes aspect-correct dimensions from the loaded texture so images are never stretched.
The Animation Loop
This is the heart of the project. Every tile runs its own useFrame callback — a function that executes every frame, managing a set of animation values that compose into the final rendered state.
I tried GSAP early on and abandoned it. The problem is interruptibility. If a user clicks a shoe while a filter transition is mid-flight, every animation needs to smoothly redirect. Timeline-based systems fight this — you spend more time managing cancellation than writing animation logic. CSS animations were never an option; they cannot reach into WebGL uniforms.
I landed on easing.damp() from the wonderful maath — a frame-rate-independent exponential damping function. Set a target, and the value chases it. Change the target mid-animation, and the value redirects. No cleanup, no cancellation.
const focusZ = useRef(0);
const curveZ = useRef(0);
const transitionZ = useRef(0);
const animatedPos = useRef({ x, y });
const filterOpacity = useRef(1);
const filterScale = useRef(1);
The final position is a composite of these independent channels:
ref.current.position.set(
  x,
  y + transitionY.current,
  curveZ.current + focusZ.current + transitionZ.current
);
Three Z contributions stack additively: curvature pushes distant tiles away, focus pops the selected card forward, transition offsets handle enter/exit. Each damps at its own speed. They never conflict because they simply add.
Custom Shaders
I wrote two custom GLSL materials using drei’s shaderMaterial() helper, which gives you a declarative JSX interface (<holoCardMaterial />) backed by raw GLSL.
I chose per-material shaders over post-processing for a specific reason: my effects are interaction-driven and per-card. The holographic sheen only appears on the selected card. A post-processing bloom pass would process every pixel on screen to affect one card. Keeping the effect in the material means zero overhead for the other 59.
Topography Background
The background is an animated contour-line field — a living topographic map that gives the scene a technical, CAD-like depth without competing with the shoe imagery.
How the Isolines Work
The fragment shader samples 2D simplex noise (imported via glslify) and drifts it slowly over time:
#pragma glslify: snoise = require('glsl-noise/simplex/2d')
float n = snoise(noiseUv * uScale + uTime * 0.05);
The contour lines come from a classic isoline extraction technique. Multiply the noise by a frequency, take the fractional part to create repeating bands, then carve thin lines at the band boundaries with a smoothstep pair:
float lines = fract(n * 5.0);
float pattern = smoothstep(0.5 - uLineThickness, 0.5, lines)
              - smoothstep(0.5, 0.5 + uLineThickness, lines);
The two smoothstep calls create a narrow peak at 0.5 — exactly where each band wraps around. uLineThickness (default 0.03) controls line width. The 5.0 multiplier controls how many concentric rings appear per noise octave. I spent a while tuning these — too thick and it looks like a loading spinner, too thin and it disappears on low-DPI screens.
Masking and Grain
A circular mask feathers the edges, and film grain prevents banding:
float grain = (fract(sin(dot(vUv * 2.0, vec2(12.9898, 78.233))) * 43758.5453) - 0.5) * 0.15;
vec3 finalColor = uColor + grain;
gl_FragColor = vec4(finalColor, pattern * opacity * mask * uOpacity);
The whole thing sits on a plane at Z -15 with depthWrite={false} and renderOrder={-1} so it never occludes the cards. When the user zooms into a shoe, uOpacity fades to 0.25 — the background recedes without disappearing.
Holographic Card Material
The card material adds a holographic sheen sweep when a card is selected. This was the most fun shader to write because the effect is entirely driven by a single uniform: uActive.
Vertex Breathing
The vertex shader applies a subtle sine-wave scale oscillation on selected cards:
float breath = sin(uTime * 2.0) * 0.015 * uActive;
float scale = 1.0 + breath;
gl_Position = projectionMatrix * modelViewMatrix * vec4(pos * scale, 1.0);
When uActive is 0, breathing multiplies to zero — no work for unselected cards.
The Sheen Sweep
The fragment shader’s sheen effect was a happy accident. I initially wanted a static holographic gradient, but mapping the sheen position directly to uActive created this sweep animation for free — as the uniform animates from 0 to 1, the band naturally slides across the card:
float diagonal = (vUv.x * 0.8) + vUv.y;
float sheenPos = uActive * 2.5;
float sheenWidth = 0.5;
float dist = abs(diagonal - sheenPos);
float intensity = 1.0 - smoothstep(0.0, sheenWidth, dist);
intensity = pow(intensity, 3.0);
The 0.8 multiplier on the X-axis is the “tilt” factor. In a standard $x + y$ setup, the gradient moves at a perfect 45° angle. By weighting the X-axis slightly less than the Y, we rotate the sweep line to be more vertical, which feels more natural for a card being held up to a light source.
The pow(intensity, 3.0) is our “focus” control. Without it, the sheen is a wide, muddy wash. By raising the intensity to a power, we push the lower values toward zero and keep only the peak, sharpening the falloff from a soft glow into a concentrated, high-end “specular” streak.
A fade-out at the end prevents the sheen from sticking:
float sheenFade = 1.0 - smoothstep(0.7, 1.0, uActive);
vec3 sheenColor = vec3(0.85, 0.92, 1.0) * intensity * 0.9 * sheenFade;
vec3 finalColor = baseColor + sheenColor * texColor.a;
The cool blue-white color is additive, masked by the texture’s alpha to stay within the shoe silhouette.
Asymmetric Timing
One small detail that made a big difference: I animate uActive with different damping speeds for selection and deselection:
const activeDamp = isActive ? 0.6 : 0.15;
easing.damp(imageRef.current.material, "uActive", isActive ? 1 : 0, activeDamp, delta);
Slow in (0.6s), fast out (0.15s). You savor the reveal but never wait for the dismiss. This asymmetry is subtle enough that users do not consciously notice it, but removing it makes the whole interaction feel sluggish.
The Camera Rig
I built a custom camera rig from scratch instead of using drei’s OrbitControls. OrbitControls gives you a rotating camera orbiting a center point — I needed a 2D panning camera with bounded drag, rubber-band edges, and velocity-based tilt. Every constraint in OrbitControls would have fought me.
How It Works
The rig is a mutable singleton shared between the camera component and every tile:
const rigState = {
  target: new THREE.Vector3(0, 2, 0),
  current: new THREE.Vector3(0, 2, 0),
  velocity: new THREE.Vector3(0, 0, 0),
  zoom: CONFIG.zoomOut,
  isDragging: false,
  activeId: null,
};
Pointer events update target. Every frame, current damps toward target. The camera reads current. This indirection is what makes everything feel smooth — user input is never applied directly.
Drag and Bounds
I distinguish clicks from drags using a distance threshold (5px desktop, 15px touch). Drag sensitivity scales with camera distance so panning feels consistent at any zoom level.
Past the grid edges, rubber-band resistance kicks in — you can overdrag 25% before a hard clamp. On release, the camera snaps back. It is the same pattern iOS uses for scroll bounce, and it communicates “you have reached the edge” without a hard stop.
Selection
Clicking a tile triggers a simultaneous pan and zoom. The selected card scales to 1.5x and pops forward 2 units on Z. All other cards shrink to 0.5x and fade to 15% opacity — a dramatic spotlight.

Filtering and Collection Switching
The app supports two kinds of transitions, and the interesting part is that they require fundamentally different strategies.
In-Place Filtering
When you filter within a collection (say, “All” to “Jordan”), I do not unmount and remount tiles. That would mean texture re-uploads, which means frame drops. Instead, matching items smoothly reposition to fill a denser grid while non-matching items fade and shrink in place:
easing.damp(animatedPos.current, "x", basePos.x, 0.2, delta);
easing.damp(animatedPos.current, "y", basePos.y, 0.2, delta);
const targetFilterOpacity = matchesFilter ? 1 : 0;
const targetFilterScale = matchesFilter ? 1 : 0.5;
easing.damp(filterOpacity, "current", targetFilterOpacity, 0.06, delta);
Hidden tiles stay mounted but invisible — visible = false once opacity drops below 0.01. This means filter changes are instantaneous. No GPU work, just uniform changes and a position recalculation.
Collection Switching
Switching collections is a heavier operation — entirely different shoe data. I solved this with a layer stack: the old grid and new grid coexist briefly, each rendering as a separate component with a unique React key.
const handleCollectionSwitch = (index) => {
  setGridLayers((prev) => {
    const exitingLayers = prev.map((layer) =>
      layer.mode === "enter"
        ? { ...layer, mode: "exit", startTime: now }
        : layer
    );
    const newLayer = {
      id: `grid-${index}-${now}`,
      items: collectionsData[index],
      mode: "enter",
      startTime: now,
    };
    return [...exitingLayers, newLayer];
  });
  setTimeout(() => {
    setGridLayers((prev) => prev.filter((l) => l.mode === "enter"));
  }, CONFIG.cleanupTimeout);
};
The old grid flies toward the camera (Z +20) while the new one arrives from behind (Z -50). Each tile gets a random stagger delay. The effect reads as an explosion rather than a slide — deliberate. A simple crossfade felt flat. The Z-axis movement creates a sense of physical space, and the random stagger prevents the mechanical feel of synchronized motion.
Entering tiles also spread on Y based on their grid position — top items start higher, bottom items lower — creating a “convergence from all directions” feel.
Polish
The Dynamic Island
The bottom control bar borrows Apple’s Dynamic Island pattern: a single glassmorphic container that morphs between states. I used Framer Motion’s layout prop for this because it handles something CSS cannot — animating between completely different DOM structures.
MiniMap
A 2D <canvas> overlay runs its own requestAnimationFrame loop, independent of R3F. Each shoe is a dot, the selected shoe glows gold, and a white rectangle shows the visible viewport. On selection, the minimap smoothly zooms to 2.5x around the active dot.
Performance
Three techniques kept us at 60fps:
Time-sliced mounting. Mounting 60 textured cards at once causes a GPU spike. I mount 5 per frame instead, spreading the work across ~200ms. Fast enough to be invisible, slow enough to prevent jank. I could not use InstancedMesh here — each card has a unique texture, unique labels, and unique shader state. Instancing needs shared materials.
Three-level culling. Every tile checks: has it fully exited? (skip the entire useFrame callback.) Is it beyond the view distance? (hide it.) Is its opacity near zero? (visible = false.) These checks compound — a tile that has exited a collection switch skips all per-frame work, not just rendering.
Mutable everything. Camera position, tile animation refs, shader uniforms — all mutated directly in useFrame, never touching React state. The only re-renders happen on discrete user actions: selecting a tile, changing a filter, switching a collection.
Conclusion
If I had to compress the whole project into one takeaway, it would be this: the hard part is not the 3D. The hard part is making the 3D disappear. Nobody should look at this and think “oh, a WebGL demo.” They should just feel like browsing shoes is slightly more interesting than it usually is.
The patterns that got me there — exponential damping over tweens, per-material shaders over post-processing, mutable refs over React state for anything that moves — are not particularly exotic. They are what falls out naturally when you stop treating React Three Fiber as a demo framework and start treating it as a production one. Most of the time I spent on this project was not writing shaders. It was tuning damping constants, killing unnecessary re-renders, and making sure a filter change mid-animation did not break something else.
If you are building something similar, steal the architecture: React owns structure, GLSL owns pixels, and a thin layer of mutable state bridges the two at 60fps. Everything else is taste.