Composite Rendering: The Brilliance Behind Inspiring WebGL Transitions
Explore composite rendering in WebGL and how render targets power seamless transitions and advanced scene compositing.

Free course recommendation: Master JavaScript animation with GSAP through 34 free video lessons, step-by-step projects, and hands-on demos. Enroll now →
Hey there! I’m Jeremy, a creative developer at Active Theory, a creative technology studio focused on crafting meaningful, impactful digital experiences.
Over the past few years, I’ve become increasingly interested in how WebGL experiences are structured behind the scenes, especially when it comes to transitions, layered interfaces, and post-processing effects. Rendering a single 3D scene directly to the screen works for simple cases, but it quickly becomes limiting as complexity grows.
In this walkthrough, I’ll revisit one of my earlier projects, Personal Log 2024, to explore its implementation, break down my thought process, and reflect on what I could have done better.
Going Beyond Just 3D Scenes
Before joining Active Theory, I spent a lot of time diving into personal projects to sharpen my skills and build up my portfolio. Looking back, there are plenty of things I wish I had understood sooner, insights that would have made a real difference in the work I was building. One concept, in particular, really stands out and it is composite rendering in WebGL.
Before I continue, it is important to know that there are many different names for this concept. Composite rendering could also be known as render-to-texture, FBO compositing or multipass rendering.
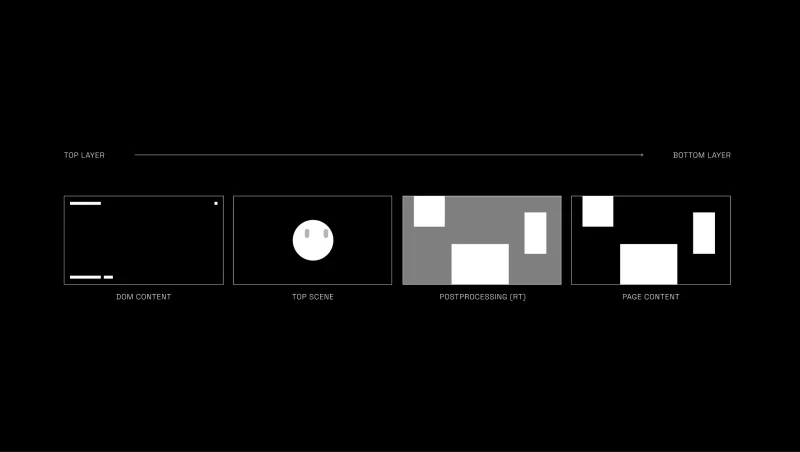
At a high level, composite rendering involves rendering a scene into an off-screen texture rather than rendering it directly to the screen. This intermediate step gives us the ability to manipulate the rendered image and add additional effects. If this sounds familiar, that’s because it is how post-processing works in Three.js. Instead of outputting the scene directly, we first render it to a render target, where effects can be applied and layered on with multiple passes. The processed result is then rendered either through the composer or, in our case, mapped to a plane geometry and enhanced further with a custom shader.
// Set up Scene A
const sceneA = new THREE.Scene();
const cameraA = new THREE.PerspectiveCamera(75, window.innerWidth / window.innerHeight, .1, 1000);
const cube = new THREE.Mesh(
    new THREE.BoxGeometry(1, 1, 1),
    new THREE.MeshBasicMaterial()
);
sceneA.add(cameraA, cube);

// Setup Scene B - For final render: render target's texture on plane
const sceneB = new THREE.Scene();
const cameraB = new THREE.PerspectiveCamera(75, window.innerWidth / window.innerHeight, .1, 1000);
const plane = new THREE.PlaneGeometry(1, 1);
const shader = new THREE.ShaderMaterial({
    vertexShader: compositeVertex,
    fragmentShader: compositeFragment,
    uniforms: {
        uTexture: new THREE.Uniform(),
    },
});
const planeMesh = new THREE.Mesh(plane, shader);
sceneB.add(cameraB, planeMesh);

// Set up Renderer
const renderer = new THREE.WebGLRenderer({
    canvas,
    antialias: true,
})
renderer.setSize(window.innerWidth, window.innerHeight);

// Set up Render Target
const renderTarget = new THREE.WebGLRenderTarget(window.innerWidth, window.innerHeight);

// Render Loop
function startRender() {
    renderer.setRenderTarget(renderTarget);
    shader.uniforms.uTexture.value = renderTarget.texture;
    renderer.render(sceneA, cameraA);
    renderer.setRenderTarget(null);
    renderer.render(sceneB, cameraB);

    window.requestAnimationFrame(startRender);
}

startRender();
Having this in your toolkit opens up a new level of creative freedom. It unlocks a wide range of possibilities, from transitioning between scenes to compositing textures and experimenting with more expressive visual effects.
Here are some examples that utilize composite render in different concepts:
- Active Theory & Slosh Seltzer: Scrolling and transitioning between multiple sections.
- Kenta Toshikura: Rendering 3D Scenes as project thumbnails.
- Aircord: Layering multiple scenes creating a seamless transition between pages.
The Spark of Brilliance
I was first introduced to composite rendering through an article by Garden Eight that dives into the tech behind the Aircord website. It offered a deep explanation on how they layer multiple scenes and handle page transitions, and it became a personal breakthrough shaping how I now structure scenes without unnecessary duplication.
For my project, the scene setup mirrors Garden Eight’s approach, but with fewer layers. Two elements are always present on screen: the face geometry and the “UI.” While the UI adapts to each page, the face geometry remains consistent across all views with a different form of interaction.
Instead of duplicating the face, I set up a main scene containing the face geometry and a plane serving as the render target. To handle responsiveness, I calculate the render target size from the camera’s vertical field of view and apply it proportionally to the X and Y scales.
const fovY =
  (this.camera.position.z + this.plane.position.z) *
  this.camera.getFilmHeight() /
  this.camera.getFocalLength();
this.plane.scale.set(fovY * camera.aspect, fovY, 1);
With the render target setup, I can now adjust the render order so it sits behind the face geometry, swap the texture to the corresponding UI, and apply post-processing, which essentially acts as a router for my experience.
Same Work, Better Brain
While the solution above does the job, there’s always room to refine it to boost performance, simplify the structure, and allow for more scalability.
FIRST, rather than rebuilding the camera, renderer, and scene scaffolding every single time, we can abstract that into reusable scene components using JavaScript’s extends feature. This allows us to define a shared foundation once and build upon it.
In the demo, I introduced a BaseScene class to encapsulate a standard Three.js scene setup to handle essentials like the scene instance, camera configuration, and project utils. On top of that, I created an FXScene (a name shamelessly borrowed from Active Theory’s internal tooling) designed specifically for scenes that require a render target.
With this architecture, we eliminate repetitive setup code while retaining full access to all shared properties and behaviors. More importantly, as the project grows, we can enrich the base classes with new capabilities like additional utilities, shared resources, debugging tools, and every inheriting scene automatically benefits from those improvements.
Below is a minimal example of an FXScene, conceptually similar to BaseScene but extended with render target configuration.
import * as THREE from 'three';
import Experience from '../../Experience'; // Singleton setup to run the entire Three.js project

export default class FXScene {
  constructor() {
    this.experience = new Experience();
    this.renderer = this.experience.renderer;

    this.initScene();
    this.initCamera();
    this.initRenderTarget();

    this.sizes = this.experience.sizes;

    this.sizes.on('resize', () => {
      this.onResize();
    });
  }

  initScene() {
    this.scene = new THREE.Scene();
    this.scene.background = null;
  }

  initCamera() {
    this.camera = new THREE.PerspectiveCamera(45, this.sizes.width / this.sizes.height, 1, 15);
    this.camera.position.set(0, 0, 5);
    this.scene.add(this.camera);
  }

  initRenderTarget() {
    this.rt = new THREE.WebGLRenderTarget(this.sizes.width, this.sizes.height, {
      minFilter: THREE.LinearFilter,
      magFilter: THREE.LinearFilter,
      format: THREE.RGBAFormat,
      stencilBuffer: false,
    });
  }

  onResize() {
    this.camera.aspect = this.sizes.width / this.sizes.height;
    this.camera.updateProjectionMatrix();
  }
}SECOND, we can simplify the composite pass by rendering a fullscreen quad directly in clip space, avoiding unnecessary projection calculations since there’s no need for depth testing or 3D calculations as it’s only displaying a texture. This involves stripping out all the matrices in the vertex shader, which you’ll see a large rectangle covering the scene without them. To ensure it stays behind all other objects, you can control its render order manually.
// const fovY = camera.getFilmHeight() / camera.getFocalLength();
// renderTarget.scale.set(fovY * camera.aspect, fovY, 1);
this.plane.renderOrder = -1;
void main() {
gl_Position = vec4(position.xy, 1.0, 1.0);
}NEXT, we can simplify the routing structure and eliminate the giant if-statement clutter. By creating a dedicated class to manage route changes using a lookup table, we can streamline the logic. The class or function would take the from and to scene textures and handle rendering and transitioning between them seamlessly.
// Setup scenes, cameras, and render targets...

constructor() {
  this.currentView = null;
}

function onViewChange(to) {
  let viewMap= {
    scene1: this.sceneOne.rt.texture,
    scene2: this.sceneTwo.rt.texture
  };

  if (!this.currentView) {
    this.currentView = viewMap['scene1'];
    this.shader.uniforms.uFromTexture.value = this.currentView;
    this.shader.uniforms.uTransition.value = 0;
    return;
  }

  if (this.currentView === viewMap[to]) return;

  this.shader.uniforms.uToTexture.value = viewMap[to];
  this.currentView = viewMap[to];
  gsap.to(this.shader.uniforms.uTransition, {
    value: 1,
    duration: 1,
    onComplete: () => {
        this.shader.uniforms.uFromTexture.value = viewMap[to]
        this.shader.uniforms.uTransition.value = 0
    }
  });
}
void main(){
vec4 fromTexture = texture2D(uFromTexture, vUv);
vec4 toTexture = texture2D(uToTexture, vUv);
vec4 color = mix(toTexture, fromTexture, uTransition);
gl_FragColor = color;
}By using this method, we can easily maintain and scale our project as we need, allowing us to have more creative freedom with transitions. Yuri Artiukh on YouTube provides great examples to follow:
mix(toTexture, fromTexture, uTransition);
mix(toTexture, fromTexture, step(uTransition, vUv.y));
mix(toTexture, fromTexture, step(uTransition, 0.5 * ( vUv.y + vUv.x )));
mix(toTexture, fromTexture, smoothstep(uTransition, uTransition + 0.3, ( vUv.x + vUv.y ) / 2.));
Lastly, in the original project, there was a subtle but important issue: the blur function was unintentionally overwriting the alpha channel of the final output. Rather than diving deep into the inner workings of blur itself, a cleaner solution was to move the blur logic directly into the composite shader we constructed earlier and handle all post-processing there. The mouse fluid effect can live in that same composite pass as well.
Consolidating these steps into a single composite shader reduces the total number of render passes, leading to better performance overall. It also centralizes all final-stage effect processing, which improves readability and maintainability, and minimizes points of failure—since we’re primarily operating on textures making debugging far more straightforward.
void main() {
  vec4 fromTexture = texture2D(uFromTexture, vUv);
  vec4 toTexture = texture2D(uToTexture, vUv);

  vec4 color = mix(toTexture, fromTexture, uTransition);

  // Postprocessing for color
  gl_FragColor = color;
}
Looking Back, Moving Forward
First of all, thank you so much for taking the time to read all the way to the end. Writing this has been an incredibly rewarding experience—revisiting work from a year ago and reflecting on my own growth has been both humbling and deeply inspiring. I feel genuinely grateful (and very lucky) to be able to share my work, and to collaborate with such a thoughtful and talented team at Active Theory. I’m excited to see how everything I’ve learned so far will shape the next chapter of my journey as a creative developer.
Cheers!